Three months into my first van build, I pulled back a section of OSB I’d laid in a hurry and found rust I hadn’t treated, sitting directly where I’d sealed it in under a sheet of foam. The metal was structurally fine. But the rust had been spreading quietly in the damp gap I’d created by getting the layers wrong and getting them in the wrong order, and by the time I caught it I’d already installed panelling above it.
That’s how I learned to treat the floor as the foundation of everything, not a footnote you sort out after the interesting parts are done.
Most van build guides cover the floor in a single paragraph or less: put some insulation down, lay a bit of ply, add your chosen floor covering. That’s technically correct but missing about half of what actually matters. A floor done badly creates cold problems, damp problems, and in a worst case, you end up pulling the whole thing apart months later on a Sunday morning in a petrol station car park, which is exactly as miserable as it sounds.
The good news is that a properly built van floor, one that’s warm, dry, and durable, genuinely doesn’t cost much if you’re clear on what the layers are doing and where you can afford to spend less.
1. The Order of Operations (And Why Most Builds Get This Wrong)
The floor should be one of the first things you do in a build, not one of the last. This catches people out more than anything else. There’s a natural pull toward working on the walls, the bed frame, the electrical system, because those feel like the real build. The floor feels like prep work. But the floor is what everything else sits on, attaches to, and depends on staying stable and dry.
Starting with the floor before the walls are panelled means you can run insulation and flooring right to the edges, eliminates awkward gaps where cold can bridge through, and gives you a clean surface to work from at every stage that follows. When the floor goes in last, it’s working around everything rather than under it.
The rust treatment step is where the order matters most. Surface rust is present on the floor of the majority of second-hand vans, usually light, usually concentrated around welds, edges, and anywhere water has collected after wet gear was loaded in. It’s easy to miss because it looks minor. But sealed under foam and ply in a warm environment with occasional condensation, it carries on spreading.
Wire brush any rust back to clean metal first. Then apply a rust converter or rust-inhibiting primer. POR-15 is the product most builders recommend and it’s reliable, though not the cheapest. Rust-Oleum Rust Reformer does a solid job on surface rust at a lower price point. For a full Transit or Sprinter floor with typical surface rust, you’ll spend $10 to $25 on product and a couple of hours on prep. Let it cure fully before laying anything over it, 24 hours minimum in cold weather.
This step adds zero height to your floor and costs almost nothing relative to the total build. Skipping it is one of the most consistent causes of problems that don’t announce themselves until the damage is already done. Budget Van Journeys has covered this across quite a few build posts and it comes up again and again in discussions with people who’ve had to redo floors.
2. Insulation: The Layer That Does the Actual Work
The van floor is the most thermally exposed surface in the whole build. It sits closest to the ground, which means cold is conducting up through it from below as well as through the metal at the sides. When you’re parked overnight and the temperature outside is dropping, the floor is where you’ll feel the cold first, especially if you’re sitting or standing on it rather than lying in a raised bed.
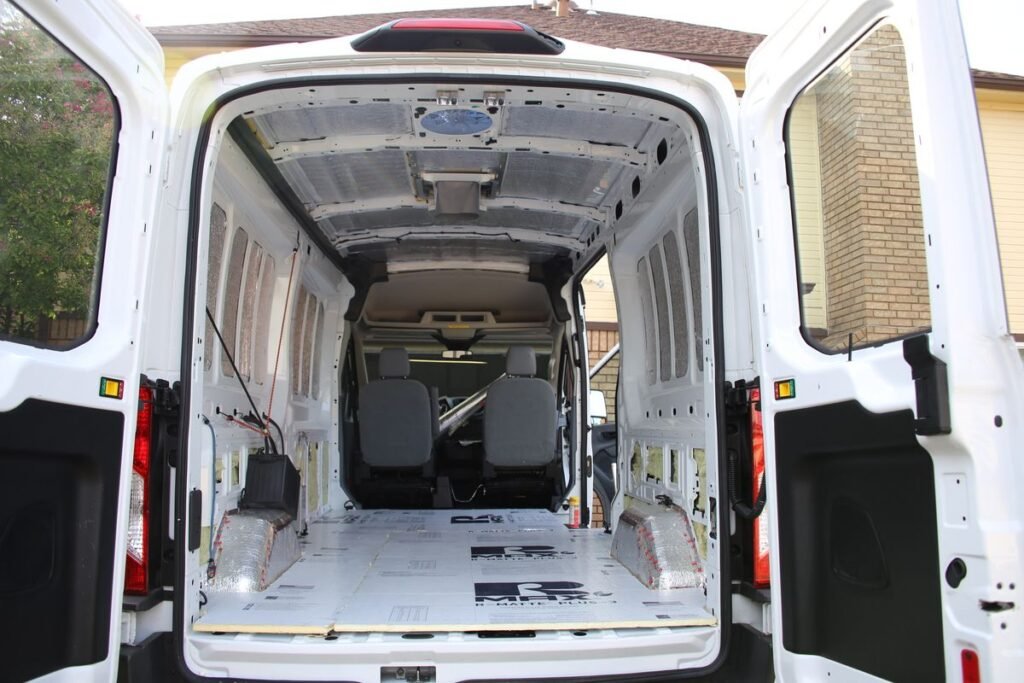
XPS rigid foam is the right material here. That’s the pink or blue foam board you’ll find in builders’ merchants and most decent hardware stores, sold in large sheets. It doesn’t compress under weight, unlike wool batts or loose fill. It doesn’t absorb moisture. It cuts cleanly with a box cutter and a straight edge. And it’s cheap relative to the thermal work it does.
25mm is the minimum worth laying. 50mm is better for cold climates or anyone planning to live in the van through winter, and if your door sill height allows it, the difference is worth the extra few centimetres you lose. Running two layers of 25mm staggered so the joins don’t align gives you slightly better performance than one 50mm sheet because you eliminate the air gaps at the cuts. It’s a small detail but costs nothing extra in effort.
A vapour barrier sits below the foam and above the rust-treated metal, a layer of heavy-duty poly sheeting that prevents moisture from condensing underneath the insulation on cold nights. Whether to include it is one of those things where builders genuinely disagree. If the van is dry and well-treated, it’s optional. If there’s any history of water ingress, any doubt at all, put it in. It adds maybe $15 to the build and takes twenty minutes to lay.
Cut the foam to fit snugly around every feature of the floor. Gaps between the foam and the van ribs or walls are cold bridges, and sloppy fitting with large air gaps undermines everything above it. Use foil tape or insulation tape over joins. You’re not creating a perfect seal, the floor doesn’t need that, but gaps wider than a few millimetres are worth addressing.
The wheel arches are worth a specific note. Rigid foam doesn’t sit well on curved surfaces, and the arches need insulating too. A can of closed-cell expanding spray foam handles the curved surfaces well and takes about ten minutes per arch. Don’t skip them because they’re awkward.
For the bigger picture on what the insulation system across the whole van is actually doing, and where it typically fails, the article on what nobody tells you about van insulation covers it in more depth than I’ll get into here.
3. The Subfloor and Finished Surface
The subfloor is the structural layer that sits on top of the insulation and provides the platform everything else attaches to. Twelve-millimetre plywood is the standard, and it’s the right choice. Light enough not to add unnecessary weight. Stiff enough not to flex underfoot when furniture is placed on it. Easy to screw into for bed legs, kitchen units, and storage. OSB is slightly cheaper and slightly heavier, and some builders use it, but plywood is worth the small premium for a floor that’s going to have things bolted to it over years of use.
Cut the subfloor in sections. Most vans have enough variation across the floor shape, around wheel arches, at the door threshold, toward the cab, that a single sheet won’t fit cleanly anyway. Number your pieces. Dry fit everything before you screw anything down. Check that your finished floor height clears the door threshold, because this is where a lot of first builds discover they’ve added more height than expected and the doors no longer close cleanly over the floor edge.
For the finished surface: click-lock vinyl plank flooring, also called LVP, is the best budget option by a significant margin. Waterproof, genuinely durable, easy to cut with a scoring knife, and available in wood-effect finishes that look decent once laid. Because it floats over the subfloor rather than being glued down, it accommodates the small movements and flexing that happen in a van body during driving without lifting at the edges. You don’t need adhesive.
Avoid carpet as your primary floor covering. It retains moisture from wet boots, it’s almost impossible to clean properly after muddy outdoor use, and it creates the exact damp conditions you’ve just worked to prevent with your vapour barrier and sealed insulation. If you want the feel of carpet underfoot, a removable rug over LVP gives you both options. The LVP stays dry; the rug comes out when it’s muddy.
Engineered hardwood looks beautiful in build photos and will cost you three times what LVP costs for equivalent durability. The more expensive it is, the more anxious you’ll be about it, and a van floor is a practical surface that will see muddy boots, spilled water, and dropped tools.
4. What It All Costs and Where to Spend vs. Save
Van Floor Build: At-a-Glance Cost Reference

Layer                    Material                            Approx. Cost
------------------------------------------------------------------------
Rust treatment           Rust converter or inhibiting primer  $10 to $25
Vapour barrier           Heavy-duty poly sheeting (optional)  $10 to $20
Floor insulation         XPS rigid foam board, 25mm           $40 to $70
Floor insulation         XPS rigid foam board, 50mm           $60 to $100
Subfloor                 12mm plywood, 2-3 sheets             $50 to $90
Finished floor           Click-lock LVP flooring              $60 to $140
Sundries                 Foil tape, self-tapping screws       $10 to $20
------------------------------------------------------------------------
Total (25mm insulation)                                       $180 to $365
Total (50mm insulation)                                       $200 to $395
That range reflects van size variation and regional material costs more than anything else. A small Ford Transit Connect sits at the lower end. A full-size high-roof Sprinter sits higher.
Where not to save: the subfloor thickness. Plywood thinner than 12mm flexes noticeably underfoot and causes problems wherever furniture legs are screwed in. This is one of those places where saving $15 on a cheaper sheet creates a floor you’ll want to redo in eighteen months. The why most first-time van builders overspend guide covers the specific areas where budget compromises backfire versus where they’re genuinely fine.
Where you can save: the finished flooring. Budget LVP at around $0.80 to $1.00 per square foot is thinner than mid-range options but holds up fine in a van context where you’re not dragging heavy furniture across it constantly. Mid-range LVP at $1.20 to $1.50 per square foot is a meaningful step up in durability and surface texture. Anything above that price point is paying for aesthetics more than function.
The total cost to build a proper van floor well sits between $180 and $400 depending on van size and material choices. For the context of a full build budget, the complete beginner build guide at Budget Van Journeys lays out where floor costs sit against everything else.
One thing worth doing before you finalise your floor height: plan out where your bed platform will go and how tall the legs need to be. The finished floor height, subfloor plus insulation plus LVP, can sometimes surprise people when combined with a bed frame that was measured before the floor was laid. Work it out on paper first. It takes five minutes and saves a lot of cutting later.
FAQs
Do I really need to insulate the van floor, or can I skip it to save height?
The floor is actually one of the places where skipping insulation has the biggest impact on comfort. Cold conducts up through the metal floor from the ground more aggressively than through the walls, especially when the van is parked on concrete or tarmac overnight. Even 25mm of XPS foam makes a noticeable difference. If headroom is genuinely critical, 25mm is a better compromise than nothing.
Can I use carpet tiles instead of LVP?
You can, and some people prefer them for the warmer feel underfoot. But carpet tiles absorb moisture and are difficult to clean after outdoor use in wet conditions. They also wear in patches over high-traffic areas. If you go with carpet tiles, treat them as a surface you’ll replace every year or two rather than a permanent installation. LVP holds up better over time.
What do I do about the van’s existing metal floor channels and ridges?
Most vans have ribbed metal floors with raised channels running along them. Fill these with cut pieces of foam before laying the main insulation layer, fitting each piece flush. This creates a level surface to lay your main insulation on and eliminates dead air pockets underneath. It adds time but not much cost.
Is OSB okay instead of plywood for the subfloor?
OSB works, and plenty of builds use it without problems. It’s slightly cheaper than plywood, slightly heavier, and slightly less easy to work with at the edges because it splinters more. For furniture attachment points where screws will be going in repeatedly over the life of the build, plywood holds threads more reliably. If you’re on a tight budget, OSB is a legitimate choice.
How do I handle the wheel arch bumps in the finished floor?
Build small wooden surrounds above the wheel arch housings to bring the floor level up around them. Cut the subfloor to fit between and around the arches, frame the arches in with short lengths of batten, and box the top of each arch with a small ply piece that brings the surface flush with your main subfloor level. The finished flooring then runs over the whole flat surface continuously. It’s more straightforward than it sounds once you’re in front of it.
For a full breakdown of where build costs go across the whole van, the van build under $5,000 guide has real cost figures across every stage of a budget build.