Every van build forum follows the same rhythm. People post floor plans, share insulation material comparisons, debate the merits of tongue-and-groove versus plywood paneling. And then someone mentions electrical systems and the conversation changes. A lot of people go quiet. Others say things like “I’m hiring that part out” or “I’ll figure it out when I get there.”
The assumption underneath all of that is that 12V electrical is a separate, specialist skill. Something closer to trade work than DIY. And it’s just not true.
A basic van electrical system has three jobs: generate power, store it, and send it safely to your appliances. That’s the whole thing. The reason it feels complicated is usually because people try to buy components before they’ve worked out what they actually need, or because they get intimidated by the terminology before they’ve had a chance to see how simple the underlying logic is. Once you understand what each component does and why, the decisions get a lot clearer.
This is the overview I wish I’d had before I started pricing builds.
1. What a Van Electrical System Actually Does
Strip it back to the fundamentals and you’ve got three parts.
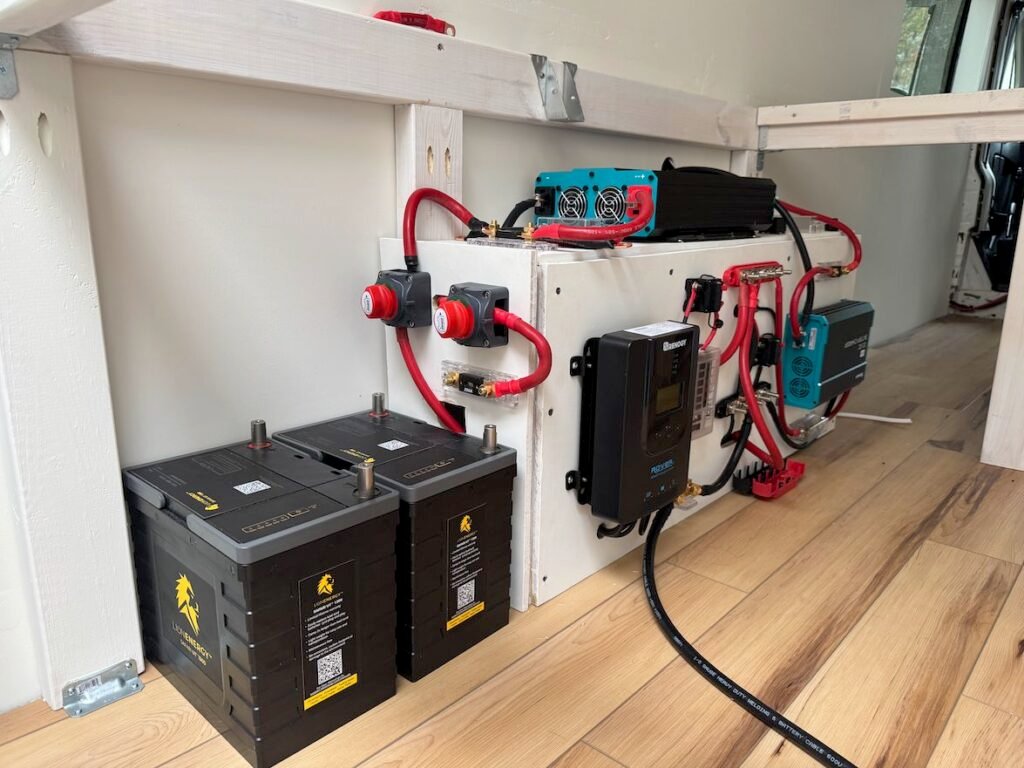
Generation is where your power comes from. In a van build, that’s usually some combination of solar panels on the roof, your vehicle’s alternator charging the leisure battery while you drive, or a shore power hook-up when you’re parked somewhere with a campsite electrical pedestal. Most functional builds use at least two of these. Relying on solar alone works well in summer and becomes a problem in November.
Storage is your battery bank. Power comes in from your panels or alternator, gets stored here, and gets drawn down as you use it. The size of your battery bank determines how long you can run your appliances without recharging, which is why sizing it correctly matters a lot more than most beginner guides admit.
Distribution is the wiring, the fuse box, and the connections between your battery and your appliances. This is also the part that people worry about most, usually because they’re confusing 12V DC with household mains electricity. They’re genuinely not the same thing. At 12V, the risks are manageable and the rules are consistent. Follow a few core guidelines around fusing and wire sizing and you’ve covered most of what can go wrong.
The order that matters here is: figure out your loads first, then size your battery, then size your solar to match. Most people do it backwards.
2. The Battery Question: AGM vs LiFePO4
This probably generates more forum debate than any other single topic in van builds. And honestly, both options make sense in different situations.
The part that often gets buried in those conversations is this: the headline capacity number on a battery is not your usable capacity. A 100Ah AGM battery does not give you 100Ah of power you can actually use.
With AGM, you can safely discharge to about 50% before you start shortening the battery’s lifespan. So 100Ah headline becomes roughly 50Ah working capacity. Repeatedly draining below that threshold doesn’t just reduce performance in the short term, it significantly reduces the number of cycles you’ll get out of the battery before it needs replacing. Most AGM batteries are rated for somewhere between 300 and 500 cycles, and that number drops if you’re regularly overdischarging.
LiFePO4 changes the maths. You can draw these down to around 20% remaining charge without damage, so 100Ah of lithium gives you roughly 80 to 85Ah of usable power. They’re also significantly lighter, which matters if you’re approaching payload limits. And the cycle count is a different category entirely, most LiFePO4 cells are rated for 2,000 cycles or more.
The catch is cost. Lithium is more expensive upfront, sometimes three times the price of a comparable AGM.
| AGM | LiFePO4 | |
|---|---|---|
| Upfront cost (100Ah) | $90–$140 | $250–$400+ |
| Usable capacity | ~50% | ~80–85% |
| Weight (100Ah approx.) | 62–68 lbs | 24–30 lbs |
| Cycle life | 300–500 | 2,000+ |
| Safe depth of discharge | 50% | 80–85% |
| Needs BMS? | No | Yes (usually built-in) |
| Best for | Tight budgets, weekend use | Full-time builds, weight savings |
If this is a weekend van and you’re watching every dollar, AGM is a reasonable starting point. But if you’re planning to live in it, or you’re thinking about where your money goes over a three-year period, lithium tends to be the better value. The Budget Van Journeys approach to most components is to look at cost-per-use, not just the sticker price, and that lens tends to favor lithium for anyone doing this seriously.
One thing worth knowing: you can add more batteries later, but mixing AGM batteries of different ages in parallel is a bad idea, and mixing lithium and AGM together is worse. Plan your bank size at the start and build toward it, rather than connecting random batteries together as you go.
3. Charging Sources: Layers, Not Options
This is where a lot of beginners get into trouble. They treat solar, alternator charging, and shore power as three separate options and pick one.
They’re not options. They’re layers, and a good build uses at least two of them.
Solar does the consistent work when the weather cooperates. A 200W panel with a decent MPPT charge controller will cover most daily usage in spring and summer without you thinking about it. The DIY solar setup guide on Budget Van Journeys goes deep on component selection and real-world costs if solar is where you want to start. What it’s worth knowing here is that winter solar output can be 30 to 40% of what you’d see in June, sometimes less, so solar-only setups need a backup.
Alternator charging is that backup for many people. While you drive, the alternator tops up your leisure battery. But here’s the issue that catches people out with modern vehicles: most vans built after roughly 2014 or 2015 have smart alternators. These vary their output voltage to reduce fuel consumption, and a traditional VSR (voltage sensing relay) interprets those fluctuations incorrectly. You can end up with a leisure battery that barely charges at all, or charges erratically.
A B2B charger, also called a DC-DC charger, solves this. It takes whatever voltage the alternator puts out and converts it into a stable, regulated charge current for your leisure battery. They cost $80 to $150 depending on amperage. For any van newer than about 2015, a B2B is worth it. A VSR isn’t.
Shore power is useful when you’re on a campsite with electrical hookups. A basic hook-up cable and a mains-to-12V battery charger is all you need. It’s not glamorous but it means you arrive at your next free camping spot with a full battery, and that’s what actually matters. If you’re doing most of your camping through free or low-cost sites, the free overnight parking guide has solid practical advice on planning around power availability.
4. Where First-Time Builders Get It Wrong
I’ve watched a lot of people make the same set of mistakes, and most of them come down to one thing: they skip the load calculation and start buying components instead.
Your load calculation is simple. Write down everything you plan to run in the van. Find the wattage of each device (it’s on the label or in the specs). Divide watts by 12 to get amps. Multiply by the hours per day you’ll run it. Add them all up. That’s your daily amp-hour consumption, and your battery bank needs to cover at least two days of that without any recharging input.
A 12V compressor fridge running continuously in warm weather can draw 30 to 50Ah per day on its own. A lot of first-time builders don’t account for the fridge at all, then wonder why their 100Ah battery is flat by mid-afternoon.
The second mistake is fuse placement. A fuse protects the wire, not the appliance. It needs to go within 12 to 18 inches of the positive battery terminal, before any connections branch off. I’ve seen DIY builds where the fuse is only at the appliance end. The cable between the battery and that fuse is completely unprotected, and any fault in that section becomes a genuine fire risk. This is also why checking the beginner build guide before you start wiring is worth the time, the order of operations matters here.
Third is wire gauge. Undersized wire creates resistance. Resistance creates heat. Heat in a wiring loom is the thing you most want to avoid. Free wire sizing calculators exist online, most ask for your maximum current and your cable run length in feet, and they give you the correct AWG. It takes four minutes. Skip it and you’re guessing.
And the overall spend question is worth thinking through early. Why most first-time van builders overspend covers the patterns that push budgets over, and electrical is one of the common culprits because people buy components piecemeal without a system plan. Component-first, plan-second is how you end up with a charge controller that doesn’t match your battery chemistry, or panels that exceed your controller’s input limits.

5. Sizing a Starter System: A Practical Starting Point
Rather than giving you a number and calling it a day, here’s a realistic profile for a functional entry-level build.
A van with a 12V compressor fridge running 24 hours, LED lighting for four hours in the evening, a laptop charged once daily, and a diesel heater fan running through the night is pulling roughly 75 to 100Ah per day depending on conditions. That’s a pretty typical full-time setup.
To cover two days without recharging: you need 150 to 200Ah of usable capacity. That means either a 200Ah LiFePO4 battery, or a 300 to 400Ah AGM bank (to stay within the 50% discharge limit).
Pair that with a 200W solar panel and an MPPT controller. Add a B2B charger for alternator input if the van is post-2015. The total component cost for a lithium-based version of this system lands somewhere between $600 and $900 depending on what you source and where. AGM brings that down to $400 to $600, but you’re carrying more weight and managing a larger bank to get the same usable capacity.
Neither of those numbers is small. But the electrical system is one place in a van build where cutting too far tends to create ongoing problems rather than just a one-time compromise. A properly sized system runs quietly in the background and you don’t think about it much. An undersized one means you’re constantly managing battery levels and adjusting what you use, which gets old quickly.
FAQs
Do I need an inverter?
Not automatically. If your appliances are 12V-native, which is the case for most van essentials like fridges, fans, lighting, and 12V laptop converters, there’s no reason to convert DC power to AC. Inverters introduce inefficiency (roughly 10 to 15% of power is lost in conversion), so running 12V direct is always preferable where possible. If you need to run a specific 230V or 120V device, a pure sine wave inverter in the 300 to 600W range handles most van use cases without costing much.
Can I expand the system later?
For solar, yes, fairly easily, as long as your charge controller has headroom. For batteries, it depends. Adding a second AGM in parallel works if the batteries are the same age, brand, and specification. Mixing old and new AGMs degrades both. Lithium batteries can be more restrictive depending on the BMS configuration. It’s worth planning your final target capacity upfront and building toward it, even if you start with less.
What’s the difference between MPPT and PWM charge controllers?
Both take power from your solar panels and regulate it into your battery. A PWM controller does this simply, reducing panel output to match battery voltage. An MPPT controller is smarter: it finds the optimal operating point for your panels and converts the excess voltage into additional current. In real conditions, MPPT recovers around 20 to 30% more power from the same panel. For a 100W entry setup with a tight budget, PWM works fine. For anything at 200W or above, or any setup in a low-light climate, MPPT is the better call.
Is it safe to do the electrical work yourself?
The 12V leisure system is DIY-legal and the voltage itself isn’t the hazard. The risk is current, specifically the heat and fire risk from underspecced wiring or poor fusing. Follow the core rules: fuse close to the battery positive, size wire correctly for the current and run length, use proper ring terminals or butt connectors rather than bare wire twists. Done properly, a DIY 12V system is safe and repairable. Any 120V shore power connection through a proper consumer unit should involve a qualified electrician.
How much does a basic system actually cost?
Entry-level functional setup: 100Ah LiFePO4 battery ($250–$350), 200W solar panel ($80–$120), 20–30A MPPT controller ($40–$70), B2B charger if needed ($90–$140), fuse block and wiring ($30–$60). Total: roughly $490 to $740. AGM-based builds can come in at $300 to $450, but you’ll need a larger bank to get equivalent usable capacity, which narrows the price gap more than people expect. Either way, getting the van build budget right as a whole is worth working through before you commit to a spec.